We've moved! I made the tough decision to move the blog to a new home. Please come with me, update your bookmarks, and drop me a note to let me know that you made the journey!
Sydney Likes Food, Version 2
Monday, February 25, 2013
Sunday, February 24, 2013
Back in business and on a roll
I'm back on the internet and back in the kitchen. I feel like Freddie Mercury dancing around, singing, "Don't stop me now!"
First of all, check out this awesome present I got from my sweet husband:
He ordered it online, and it arrived at my parents' house the same day I did. One of the pieces shattered in delivery, but it appears it was faulty packaging. I didn't want to take the chance of sending the whole thing back and getting another broken piece, so I opted for a partial refund. Now I have a 27 piece set! I used nine of the pieces last night, on a whim, to make something I've been craving for weeks. I found a recipe online that looked good, but it was vegan. I'm still not vegan. I have no interest in going vegan ever again. Once I started changing the vegan items for others, I started playing around more and more with the ingredients until it barely resembled where it started. I think I must have said "Well, it's an experiment anyway!" and "Oh, I hope this turns out well!" about 50 times as I was making it!
While they're not the same as cinnamon rolls, these guys acted as my main inspiration:
I remember eating these bad boys with my dad. I don't think I have ever just taken a bite out of one. I always had to peel it apart, layer by layer, until I got to the softest, most cinnamony part of the center. I don't even know if pecan swirls actually have pecans in them because that's sure not in my memory. All I know is that, as I started to work on my dough in the kitchen last night with my father as my assistant, I couldn't wait to pull apart some pastry.
Pecan Cinnamon Rolls
Ingredients
For the filling:
1/2 cup light brown sugar
1/4 cup white sugar
1/4 cup honey powder (if you don't have honey powder, substitute more brown sugar)
3 teaspoon ground cinnamon
1/4 cup pecans, chopped and divided
dash of salt
1 tablespoon butter, melted
For the dough:
2 1/2 cup Bob's Red Mill gluten-free all purpose flour (if you mix your own, go for brown rice, tapioca, and potato starch)
3/4 cup sorghum flour
2 teaspoon baking powder
1/2 teaspoon baking soda
1 3/4 teaspoon xantham gum
1 1/2 cups buttermilk (I used 2 teaspoon apple cider vinegar and filled the measuring cup up to 1 1/2 cups with plain milk -- I thought the lemon might be too sour in the dough -- and let it sit for about 5 minutes), divided
7 tablespoons butter, divided and melted
Spray or extra butter for pan
For the icing:
3 tablespoons cream cheese
1/4 teaspoon cinnamon
3/4 cup icing sugar
Half of the chopped pecans from the filling mix
3 tablespoons buttermilk (from the dough division)
Hardware
Large mixing bowl
Two small mixing bowls
Three small reserve bowls (milk, flour, butter)
Bowl or pan for melting butter
Pie dish or other round baking dish
Wooden spoon
Measuring cups and spoons
Oven
Microwave or stove for melting butter and heating milk
Whisk
Knife, spoon, and fork
Parchment paper, cling film, or Press 'N Seal Wrap (worked for me!)
Directions:
Depending on how fast or slow you are in the kitchen, you can go ahead and preheat the oven to 425°F/220°C. I waited to start until I was kneading the dough to preheat because I'm slow.
Go ahead and measure out your vinegar and milk, if you don't use buttermilk, and let it rest to the side.
For the filling, combine the brown sugar, white sugar, honey powder, cinnamon, half of the chopped pecans (1/8 cup or so), and salt in a small mixing bowl. Stir together with a fork. When you are sure it is combined, stir in 1 tablespoon melted butter. When well-combined, it should look like wet sand. Set aside.
Start on your dough by combining the all purpose flour and sorghum in the large bowl. Measure out about 1/2 cup and put in a reserve bowl to the side. Back in the big bowl, add in baking powder, baking soda, and xantham gum and stir with the wooden spoon.
Reserve 1/4 cup of the milk mixture in a bowl and set aside. Heat the remaining milk mixture in the microwave or on the stove. You DO NOT want it boiling or steaming hot. You only want it warm. Slowly mix 3 tablespoons of melted butter into the warm milk. Because the milk is warm, the butter should not curdle the milk and the milk should not congeal the butter back into solids. Add the milk/butter mixture into the large mixing bowl, stir a few times, and add 2 1/2 more tablespoons of melted butter into the mix. Stir with the wooden spoon until you can feel resistance and cannot see any lumps of flour (about 45 seconds for me).
Put down a layer of whatever paper you choose for your work surface. I used Press 'N Seal wrap because it could "stick" to the surface and was thick enough that I could use it as a tool. If you do use Press 'N Seal, just make sure that the adhering side is DOWN; the smoother side should be facing up toward you.
Sprinkle about 3/4 of the reserved flour on the surface and dump your dough on top. Yes, it is a lot of flour. Yes, you will need it all. Begin working the dough with your hands and kneading in all the flour. It will be very sticky, and you will probably think you've done something wrong. Keep going! Once you have integrated all the flour and you're starting to notice it looking like a real dough, sprinkle the rest of the flour onto it and knead into the dough.
Once you have it all looking nice and like it might have a promising future as a pastry, spread or roll it out into a 10"x12" rectangle. If you want a lot of swirl with thinner sides, spread it a bit further than 10 inches, but maintain the 12 inch side. Take 1 tablespoon melted butter (if you're doing the math, you should have 1/2 tablespoon left!) and spread it over the middle of the dough, all the way to the edges. Go back and get your filling mixture you made earlier and cover all but the very edges of the dough with it. There is a lot. I like it that way. If you want a higher pastry to cinnamon ratio, use a bit less. But, then, if you don't like cinnamon, why are you making cinnamon rolls?
Now for the fun part. It's where I found the Press 'N Seal saved the day. I literally lifted the front and used it to roll the dough over on to itself. If you are using a different surface, it may do the same thing. If your dough wants to stick, you might need a metal spatula to pry it up. Once you have the first roll, lightly press down -- you don't want to mash it into the other side, but you do want it to know where it belongs. Continuing rolling until you have a log. If the dough splits open at the end, patch it up. If it's in the middle, it probably won't matter. Cut the log into eight 1 1/2" slices -- I actually cut some of mine thinner and thicker to make some crispy and some smooshy. It's up to you. Arrange them in a circle around the pie dish, and then squish some in the middle, too. Press down with your palm to spread them out enough to touch. Brush with the remaining 1/2 tablespoon of melted butter.
Bake for 24-25 minutes, but, as always, check on them before the timer goes. You don't want your hard work to burn because your oven is different than mine!
While they bake, mix up the icing. Whisk together the cream cheese, cinnamon, icing sugar, and buttermilk until it is combined. I never remember to sift the icing sugar, so it took a little elbow grease to get the lumps out. Stir in the chopped pecans.
When the rolls are done, let them sit for five minutes before icing them. Use a spoon to drizzle as much or as little icing as you want. Do not, however, let your mother dunk her finger into the icing bowl. I would pour the whole bowl of icing over her cinnamon roll before I would let that happen!
Oh, and these guys are great the next day. Store them in the fridge and pop one in the microwave for about 25 seconds to get it soft and warm again. They are almost just as good. Trust me, I just did it.
First of all, check out this awesome present I got from my sweet husband:
 |
| 28 pieces of Pyrexy goodness |
While they're not the same as cinnamon rolls, these guys acted as my main inspiration:
 |
| And, yes, I do mean the ones that come in the plastic. |
Pecan Cinnamon Rolls
 |
| Ooey Gooey |
Ingredients
For the filling:
1/2 cup light brown sugar
1/4 cup white sugar
1/4 cup honey powder (if you don't have honey powder, substitute more brown sugar)
3 teaspoon ground cinnamon
1/4 cup pecans, chopped and divided
dash of salt
1 tablespoon butter, melted
For the dough:
2 1/2 cup Bob's Red Mill gluten-free all purpose flour (if you mix your own, go for brown rice, tapioca, and potato starch)
3/4 cup sorghum flour
2 teaspoon baking powder
1/2 teaspoon baking soda
1 3/4 teaspoon xantham gum
1 1/2 cups buttermilk (I used 2 teaspoon apple cider vinegar and filled the measuring cup up to 1 1/2 cups with plain milk -- I thought the lemon might be too sour in the dough -- and let it sit for about 5 minutes), divided
7 tablespoons butter, divided and melted
Spray or extra butter for pan
For the icing:
3 tablespoons cream cheese
1/4 teaspoon cinnamon
3/4 cup icing sugar
Half of the chopped pecans from the filling mix
3 tablespoons buttermilk (from the dough division)
Hardware
Large mixing bowl
Two small mixing bowls
Three small reserve bowls (milk, flour, butter)
Bowl or pan for melting butter
Pie dish or other round baking dish
Wooden spoon
Measuring cups and spoons
Oven
Microwave or stove for melting butter and heating milk
Whisk
Knife, spoon, and fork
Parchment paper, cling film, or Press 'N Seal Wrap (worked for me!)
Directions:
Depending on how fast or slow you are in the kitchen, you can go ahead and preheat the oven to 425°F/220°C. I waited to start until I was kneading the dough to preheat because I'm slow.
Go ahead and measure out your vinegar and milk, if you don't use buttermilk, and let it rest to the side.
For the filling, combine the brown sugar, white sugar, honey powder, cinnamon, half of the chopped pecans (1/8 cup or so), and salt in a small mixing bowl. Stir together with a fork. When you are sure it is combined, stir in 1 tablespoon melted butter. When well-combined, it should look like wet sand. Set aside.
Start on your dough by combining the all purpose flour and sorghum in the large bowl. Measure out about 1/2 cup and put in a reserve bowl to the side. Back in the big bowl, add in baking powder, baking soda, and xantham gum and stir with the wooden spoon.
Reserve 1/4 cup of the milk mixture in a bowl and set aside. Heat the remaining milk mixture in the microwave or on the stove. You DO NOT want it boiling or steaming hot. You only want it warm. Slowly mix 3 tablespoons of melted butter into the warm milk. Because the milk is warm, the butter should not curdle the milk and the milk should not congeal the butter back into solids. Add the milk/butter mixture into the large mixing bowl, stir a few times, and add 2 1/2 more tablespoons of melted butter into the mix. Stir with the wooden spoon until you can feel resistance and cannot see any lumps of flour (about 45 seconds for me).
Put down a layer of whatever paper you choose for your work surface. I used Press 'N Seal wrap because it could "stick" to the surface and was thick enough that I could use it as a tool. If you do use Press 'N Seal, just make sure that the adhering side is DOWN; the smoother side should be facing up toward you.
Sprinkle about 3/4 of the reserved flour on the surface and dump your dough on top. Yes, it is a lot of flour. Yes, you will need it all. Begin working the dough with your hands and kneading in all the flour. It will be very sticky, and you will probably think you've done something wrong. Keep going! Once you have integrated all the flour and you're starting to notice it looking like a real dough, sprinkle the rest of the flour onto it and knead into the dough.
Once you have it all looking nice and like it might have a promising future as a pastry, spread or roll it out into a 10"x12" rectangle. If you want a lot of swirl with thinner sides, spread it a bit further than 10 inches, but maintain the 12 inch side. Take 1 tablespoon melted butter (if you're doing the math, you should have 1/2 tablespoon left!) and spread it over the middle of the dough, all the way to the edges. Go back and get your filling mixture you made earlier and cover all but the very edges of the dough with it. There is a lot. I like it that way. If you want a higher pastry to cinnamon ratio, use a bit less. But, then, if you don't like cinnamon, why are you making cinnamon rolls?
Now for the fun part. It's where I found the Press 'N Seal saved the day. I literally lifted the front and used it to roll the dough over on to itself. If you are using a different surface, it may do the same thing. If your dough wants to stick, you might need a metal spatula to pry it up. Once you have the first roll, lightly press down -- you don't want to mash it into the other side, but you do want it to know where it belongs. Continuing rolling until you have a log. If the dough splits open at the end, patch it up. If it's in the middle, it probably won't matter. Cut the log into eight 1 1/2" slices -- I actually cut some of mine thinner and thicker to make some crispy and some smooshy. It's up to you. Arrange them in a circle around the pie dish, and then squish some in the middle, too. Press down with your palm to spread them out enough to touch. Brush with the remaining 1/2 tablespoon of melted butter.
Bake for 24-25 minutes, but, as always, check on them before the timer goes. You don't want your hard work to burn because your oven is different than mine!
While they bake, mix up the icing. Whisk together the cream cheese, cinnamon, icing sugar, and buttermilk until it is combined. I never remember to sift the icing sugar, so it took a little elbow grease to get the lumps out. Stir in the chopped pecans.
When the rolls are done, let them sit for five minutes before icing them. Use a spoon to drizzle as much or as little icing as you want. Do not, however, let your mother dunk her finger into the icing bowl. I would pour the whole bowl of icing over her cinnamon roll before I would let that happen!
Oh, and these guys are great the next day. Store them in the fridge and pop one in the microwave for about 25 seconds to get it soft and warm again. They are almost just as good. Trust me, I just did it.
 |
| You can let your mother scrape up some of the cinnamon meltiness at the bottom of the pan. She'll probably do it whether you allow it or not. |
Saturday, November 24, 2012
Thanksgiving 2012 & feeding the stuffing addiction
 |
| CB thinks it's hilarious when I wear his apron because I can't eat pork. |
Here was our menu:
Turkey (cheated and bought a Marks and Spencers ready-to-roast job)
Gravy
Cornbread and bacon stuffing
Sweet potato casserole
Green bean casserole
Pecan-crusted spinach and artichoke dip
Baked macaroni and cheese
Sour cream mashed potatoes
Pao de queijo (not traditional Thanksgiving by far, but I wanted rolls, and this is what I got)
Pumpkin cheesecake
Pumpkin cupcakes
I was going to make oven-roasted root vegetables but decided at the last minute that we had more than enough food already.
 |
| Clockwise from top left: Cornbread and bacon stuffing, sour cream mashed potatoes, gravy, pumpkin cupcakes, pecan-crusted spinach and artichoke dip, pao de queijo, turkey breast, green bean casserole (left), sweet potato casserole (right), and the shining sun in the center is the baked macaroni and cheese. Pumpkin cheesecake not pictured. And, yes, we have a terrible tablecloth. We know. |
When I was young, I became fascinated with stuffing. It was my favourite part of Thanksgiving, and I remember being so excited when I found out you could eat it other times of the year. I begged for it until my mother finally showed me a box and told me I could make it myself. No, it's not good for you, and it's especially not good for you from a box!
When I found out I couldn't eat gluten, stuffing was the first thing that came to mind. Instantly, I wanted it all the time and for every meal. Gluten-free stuffing mixes exist here (well, at least one), and, while tasty, they just don't scratch the itch of this Stove Top purist. I'm afraid nothing ever will. However, last year, while visiting my parents for Christmas, I came upon a recipe that I adapted into a satisfying replacement. Don't get me wrong -- it doesn't taste like Stove Top -- but it is good enough to go back for seconds. I used a bag of Bob's Red Mill cornbread mix last year, but I didn't have one for Thanksgiving. I immediately went to the Gluten Free Goddess and located something I could make work for me with several adjustments. So, without further ado, here is my version of what makes Thanksgiving Thanksgiving.
Cornbread and Bacon Stuffing
Sweet Cornbread
Ingredients:
1 cup stone ground gluten-free cornmeal
3/4 cup sorghum flour
1/2 cup tapioca starch
1 teaspoon xanthan gum
1 teaspoon baking soda
1 1/2 teaspoons baking powder
1 teaspoon fine sea salt
1 teaspoon coarse sea salt (optional -- not included in dry ingredients list)
1/2 cup organic light brown sugar
2 eggs
1/2 cup plus 2 tablespoons light olive oil
1 cup very warm water
1/2 teaspoon lime juice
2 extra tablespoons water, if needed
Hardware:
Cast iron skillet
Oven
2 mixing bowls
2 whisks
Measuring cups and spoons
Spatula (to get the last bits out of the bowl)
Directions:
Preheat oven to 375°F/190°C with lightly greased skillet inside.
Combine the dry ingredients -- cornmeal, sorghum flour, tapioca starch, xanthan gum, baking soda, baking powder, fine sea salt, and brown sugar -- in a bowl and whisk until they are thoroughly combined. Set aside.
Whisk the eggs and olive oil together for about 1 minute. This is where the original recipe had me confused. I checked the comments and notes, and it seems like I'm the only person who can't seem to figure it out. I don't see where the warm water and juice is meant to be added. I choose to add it here, as I thought it might be lumpy if you tried to mix it in later. So, add the lime juice and the warm water. Mix to combine.
Add the dry bowl to the wet bowl in three or four portions, ensuring to mix thoroughly between each portion. You are looking for a smooth, cake-like batter; do not beat it past when it looks like cake batter. If your batter is too thick, add in a little extra warm water, bit by bit, until you get the consistency you want. Mine came out perfect without extra water.
Remove the skillet from the oven (carefully!) and sprinkle the coarse sea salt into it. The salt here is optional, but I love the complexity it gives a sweet cornbread. Pour the batter into the skillet, scraping the bowl with the spatula to make sure you have it all.
Bake for 25-30 minutes until a toothpick comes out clean. Definitely check on it at 25 minutes because mine did not need any longer. Let the cornbread cool for at least 15 minutes before cutting and serving (or turning it into stuffing).
Stuffing
Ingredients:
3 cups crumbled cornbread
6 slices gluten-free bread, toasted
6 slices bacon (I used 4 slices of turkey bacon [turkey bacon has bigger pieces because there is less fat])
2 eggs
1 cup chicken broth
1 cup onion, chopped
1 cup celery, chopped (I didn't bother)
1/2 teaspoon salt
1/4 teaspoon black pepper
1/4 teaspoon sage
1/4 teaspoon thyme
1/4 teaspoon garlic powder
Hardware:
Casserole dish with lid that can go in oven
Oven
Stove
Small bowl
Measuring cups and spoons
Frying pan or skillet
Various kitchen utensils (fork, spatula, something to help with frying)
Mixing bowl
Directions:
Preheat oven to 350°F/175°C.
Cut the toasted bread into small cubes. Set aside.
Fry the bacon until crispy and remove from the pan. If you are using veggie or turkey bacon, add some oil to the pan, as there is a lot less fat in them than pork bacon. Add the onion, celery, sage, and thyme to the pan and fry until the onion is tender and translucent. Remove from heat. Crumble cooled bacon back into the pan.
In the small bowl, beat the eggs with the fork. Add to the mixing bowl with the bacon and onions/celery and all seasonings -- salt, black pepper, and garlic powder. Fold together with the fork. Add the cornbread crumbles and bread cubes and fold with the spatula. Try to ensure that all the dry parts are covered. Pour half of the chicken broth over the mixture and fold with the spatula. Assess how much more broth you need (I needed the whole cup) to completely moisten the mixture and add it in. Fold again.
Pour the mixture into the casserole dish (no need for greasing) and cover. Bake in oven for 30 minutes. Alternatively, it can be used to stuff a bird instead of baking. I'm not that adventurous yet.
Tuesday, November 20, 2012
R.I.P. Autumn
I don't care what the actual dates or markers are for the end of autumn. This is it for me.
This is the last pumpkin of 2012.
.JPG)
This is the last pumpkin of 2012.
.JPG)
Wednesday, October 31, 2012
CB likes food, too
Sometimes I'm so selfless, I make food for people I can't even eat! Now that I'm truly getting better from my surgery, I'm trying to do more things when I'm not grading essays. This week, I made a lunch (and dinner) for CB that had prawns -- a food I am VERY allergic to -- but was actually gluten-free. I made myself a dinner out of the non-prawny leftovers with a wee bit of chicken cooked with the same flavours but with olive oil instead of the butter. I'm pretty sure this would be tasty without any meat if you amp up the veggies a bit more. Any veggies could go well with it, I think. If you substituted the butter, you could even make it vegan!
Prawn and Veggie Quinoa
Ingredients
prawns -- 8-9 per person, I cheated and bought peeled & cooked, but it was to be sure I wasn't in too much contact with them
1 cup quinoa
2 cups water (plus some in a bowl)
1 vegetable stock cube (optional)
handful of black olives, pitted
handful of cherry tomatoes
handful of green beans
half-head of broccoli
1 lime
little gem lettuce -- or small romaine leaves
fresh coriander leaves -- cilantro on that side of the ocean
a few tablespoons of butter
garlic powder
chili flakes
black pepper
Hardware
mixing bowl
a couple of pots and pans (at least one pot with a lid)
stove
bowl
fine mesh strainer
colander
assorted metal cooking utensils
knife
Directions
Pour the quinoa into the mesh strainer and rinse under water for about two minutes, rubbing the grains within your fingers. This step is important because quinoa can taste bitter and woody if you don't remove the natural outer coating. Some quinoa comes pre-scrubbed, but I still give it a go-over. In a decent-sized pot, melt enough butter to coat the bottom. Toss in the quinoa and stir vigorously until you get a nutty scent. If, like me, you have spent most of your life nasally-impaired, this takes about 45 seconds to a minute. Pour the water over the quinoa and stir. When the water begins to boil, cover and simmer for 15 minutes. If there is still water in the pan, re-cover and let it continue to simmer until all the water evaporates. Turn off the heat and let it stand uncovered for five minutes. Dump it into the mixing bowl and fluff with a fork.
Boil water in another pot with a bit of sea salt. Chop broccoli into bite-sized pieces. I cooked the broccoli and the green beans together because, well, I don't see why not. Cook to your desired consistency, drain, and dunk immediately in a bowl of cold water for a minute or so.
Cut the green beans into manageable pieces. Drop it and the broccoli into the mixing bowl with the quinoa. Cut the olives in half and toss in the quinoa. Chop the coriander roughly (I used herb scissors I got as a wedding present that made me feel very special indeed) into the mix. Toss it all together until it is well-mixed.
Ok, I tried to get a little fancy with the tomatoes. I cut them in half and put them in a very hot, heavy-bottomed pan -- NOT flat side down. If you put them flat side down, the heat will pull the seeds out and get gunky. But, the magic is, if you leave them down on one round part and leave them there for a couple of minutes, they will char on that side and create a sweetness throughout the whole bite. Just make sure to remove them before they start smoking and dump them in the mixing bowl.
Now for the prawns! I don't generally cook things I'm allergic to, so I'm glad these came out as well as they did. I put a fair amount of butter in a pan -- more than I thought was needed, actually. Toss in the garlic powder, chili flakes, and black pepper. Squeeze half the lime (don't worry about trying too hard) into the butter and spice mixture and stir it all around. When it's nice and bubbly and coating the entire pan surface -- and then some! -- place the prawns in one at a time. I like to place them into the pan clockwise, so I know what order to flip them. After about 30 seconds, swirl the pan around. After another 30 seconds, flip them over. Do the same again. Obviously, if you have uncooked prawns to started, you're going to need to cook them more. I have no idea about that.
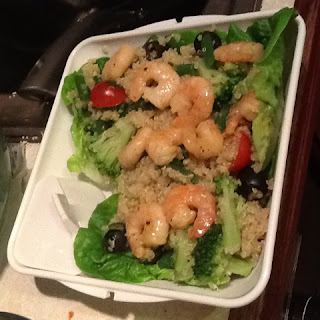
Place the lettuce leaves out on a plate. Spoon the quinoa mixture on top of them. Place the prawns on top. Offer up lime wedges for an extra tang.
Here is CB's lunch box for Monday. It may not look like it, but there was a TON of quinoa packed in there (and a lime wedge in the wee box).
Prawn and Veggie Quinoa
Ingredients
prawns -- 8-9 per person, I cheated and bought peeled & cooked, but it was to be sure I wasn't in too much contact with them
1 cup quinoa
2 cups water (plus some in a bowl)
1 vegetable stock cube (optional)
handful of black olives, pitted
handful of cherry tomatoes
handful of green beans
half-head of broccoli
1 lime
little gem lettuce -- or small romaine leaves
fresh coriander leaves -- cilantro on that side of the ocean
a few tablespoons of butter
garlic powder
chili flakes
black pepper
Hardware
mixing bowl
a couple of pots and pans (at least one pot with a lid)
stove
bowl
fine mesh strainer
colander
assorted metal cooking utensils
knife
Directions
Pour the quinoa into the mesh strainer and rinse under water for about two minutes, rubbing the grains within your fingers. This step is important because quinoa can taste bitter and woody if you don't remove the natural outer coating. Some quinoa comes pre-scrubbed, but I still give it a go-over. In a decent-sized pot, melt enough butter to coat the bottom. Toss in the quinoa and stir vigorously until you get a nutty scent. If, like me, you have spent most of your life nasally-impaired, this takes about 45 seconds to a minute. Pour the water over the quinoa and stir. When the water begins to boil, cover and simmer for 15 minutes. If there is still water in the pan, re-cover and let it continue to simmer until all the water evaporates. Turn off the heat and let it stand uncovered for five minutes. Dump it into the mixing bowl and fluff with a fork.
Boil water in another pot with a bit of sea salt. Chop broccoli into bite-sized pieces. I cooked the broccoli and the green beans together because, well, I don't see why not. Cook to your desired consistency, drain, and dunk immediately in a bowl of cold water for a minute or so.
Cut the green beans into manageable pieces. Drop it and the broccoli into the mixing bowl with the quinoa. Cut the olives in half and toss in the quinoa. Chop the coriander roughly (I used herb scissors I got as a wedding present that made me feel very special indeed) into the mix. Toss it all together until it is well-mixed.
Ok, I tried to get a little fancy with the tomatoes. I cut them in half and put them in a very hot, heavy-bottomed pan -- NOT flat side down. If you put them flat side down, the heat will pull the seeds out and get gunky. But, the magic is, if you leave them down on one round part and leave them there for a couple of minutes, they will char on that side and create a sweetness throughout the whole bite. Just make sure to remove them before they start smoking and dump them in the mixing bowl.
Now for the prawns! I don't generally cook things I'm allergic to, so I'm glad these came out as well as they did. I put a fair amount of butter in a pan -- more than I thought was needed, actually. Toss in the garlic powder, chili flakes, and black pepper. Squeeze half the lime (don't worry about trying too hard) into the butter and spice mixture and stir it all around. When it's nice and bubbly and coating the entire pan surface -- and then some! -- place the prawns in one at a time. I like to place them into the pan clockwise, so I know what order to flip them. After about 30 seconds, swirl the pan around. After another 30 seconds, flip them over. Do the same again. Obviously, if you have uncooked prawns to started, you're going to need to cook them more. I have no idea about that.
Place the lettuce leaves out on a plate. Spoon the quinoa mixture on top of them. Place the prawns on top. Offer up lime wedges for an extra tang.
Here is CB's lunch box for Monday. It may not look like it, but there was a TON of quinoa packed in there (and a lime wedge in the wee box).

Sunday, October 21, 2012
Jennifer Esposito calls out CBS and I make tacos
Lest I fall into the same pattern as the shops around town, I made sure to make my mother a gluten-free dinner that didn't have to be made with exceptions or substitutions. It's not hard to find a cake or cookie suitable for a gluten-free lifestyle in Tesco or M&S; this is not to say that they are all tasty! However, it's much harder to find a decent loaf of bread. Considering all the foods that have "hidden" gluten -- meaning, not just bread -- it's more important that we can eat dinner than dessert!
As I watch my mother struggle with her new lifestyle, I realise how lucky I was to have supportive folks around me as I worked my way through the changes. I did it very much alone in the sense that I didn't know anyone who could give me advice or show me the ropes, but I did have my husband (while he was still on the way to being my husband) and our families for moral support.
All these thoughts were piqued today when I read this article: Blue Bloods' Jennifer Esposito Departs Show, Slams CBS For Its 'Shameful Behavior'. I don't know this actress (I mean, I've seen her in things) or anyone else on the show or in the network, so I can't speak to what truly happened. However, her words "[...] CBS implied that I was not truly ill [...]" struck such a chord with me. I know most Celiacs don't like to actually say "Celiac Disease" because it sounds so terrible like that. However, it IS a disease, and it is something that requires actual treatment and consideration. Some people think that, just because the most-known treatment is not eating particular food that it's not as bad as other diseases. You don't hear people saying the same about Diabetes, which also involves a specific diet as a major form of treatment. While, like I said, I don't know for a fact that CBS acted terribly, her phrasing makes it sounds real. It is something that happens, and it shouldn't.
Anyway, so, in an effort to support my mother through the process and show her that real food is within reach, I made tacos. Tacos have long been one of her favourite meals, but removing both beef and gluten from her diet have made the concept of making them unappealing for her. What follows isn't really a recipe for tacos as much as it is just a chronicle of the meal.
I made tortillas with masa harina (OH! That is what was in the mystery jar! Mystery solved!), water, and sea salt in my tortilla press. I fried them without oil in a cast iron skillet and kept them warm until everything else was prepared. I battered the chicken lightly in a seasoned corn meal and pan fried. It was served with lettuce, cheese, sour cream, and salsa (I decided against the salsa because of my recent surgery). It was a great send-off for my mother's last meal in Belfast (this time!).

Gluten-free facts, part 2
1. When you first stop eating gluten, your body will be very confused. You will likely get hungry all the time. My suggestion is, for the first week or so (listen to your body!), really up your protein intake. Don't immediately move to gluten-free substitutions unless you have to because your body will grab hold of them and immediately slow down its processing. I carried around turkey jerky in my handbag. Yes, it was super-classy.
2. Your energy levels will probably hit an all-time low for the first couple of days after leaving behind gluten. I don't suggest moving to a gluten-free diet when you have a big meeting or when your kids have a weekend full of baseball practices. That being said, if you look at your calendar and find yourself making excuses for every few days, JUST DO IT. After the low comes the best all-time energy high you have probably experienced in your entire life. I swear, I think my eyes were even bigger! Everyone began complimenting me -- did I lose weight? did I change my hair? I just took the things my body saw as poisons out of my body!
3. As far as pasta is concerned, brown rice pastas are the best. They hold their texture and really hold up to overcooking. The first time I made baked macaroni without wheat pasta, I tried a mostly-corn pasta. I cooked it according to the directions, and it was a little soggy. However, once I added the rest of the ingredients, it didn't hold up. I was left with a wet pasta mush at the bottom of the dish with too-thick sauce along the top. It was gross. I eventually tried again with a brown rice pasta, and it was perfect. I couldn't tell the difference between it and the wheat version.
4. In the first part of my gluten-free facts, I mentioned that it's better to make your own sauces. Honestly, if you have the time, it will always pay off to make any of your own gluten-free foods than to buy them. I'd say the exception is probably bread because baking bread is not something everyone enjoys or can do. I don't say that to be offensive. My first loaf of gluten-free bread was a gluey mess. It made me not want to try again.
5. Gluten affects everyone differently, not just those with gluten allergies/intolerances and not. I need things to be handled carefully, using different utensils for my food and to make sure they don't touch. I need precautions with things that you might never even consider -- even though the crumbs fall through a toaster, all those gluteny crumbs are heating up all over your gluten-free bread! If you're less sensitive, please be understanding to people who take more precautions than you do. If you're more sensitive, please be understanding that not everyone has to jump through all the same hoops as you do. Neither one is doing it to be belligerent, so please don't act as though you know what's best for someone else.
Subscribe to:
Posts (Atom)
